Site Overlay

How To Start a Blog For Free – Newbie’s Guide for 2020

If you have the idea of starting a new blog and have no way to begin, or where to start and what do you need to get it done? Well this is the best place where you can learn everything you need to know about ‘how to start a blog for free’. 

So..how on earth do you start? The information you found on the internet is quite overwhelming, every website teaches you to do a different thing and then you are stuck and don’t know where to begin. Who should you listen to? 

Damn it! It’s too complicated and confusing so let’s forget about it. Hold on a minute…

Let’s get hold of yourself now and listen to me! Well, I used to be like you when I tried to build a blog back in the day and were having the same issues like you are facing now. I began learning how to start a blog back in 2015, went through several trial and error before I can successfully get one up and running like a charm. I spent less than a day learning how to set up a blog online.

Now, 2020 I know everything about blogging from WordPress to HTML and doing quite well with it. My other blogs that focus on other subjects have tons of visitors per month that come to learn from what I have to offer to teach for free, and this site is one of them that shows you how to start a blog for free. Please don’t misunderstood I am not any guru or mentor I just teach the basic and essential things you need to know.

I know many of you are newbies and I swear to you this content will be very simple for you to understand and written in plain English with no tech-savvy idiom, even your grandma can understand it well. Does it sound good for you now?

Good! Let’s move on.

Why You Should Learn How To Start A Blog?

Within this section, I am going to give you a simple step-by-step guide on how to start and build a personal blog. But wait! Don’t rush, before we head forward I really need to tell you why you should start a blog.

Note: If you already know how to start a blog, you can skip this section and go straight to the guide far below.

Why Blogging?

Blogging has become the most popular place for spreading news and information. Almost 60% of websites are blogs and more and more are increasing each day, already over a million now in 2020. But not to worry, I will show you how to build a unique blog that stands out from the crowd.

But first you need to understand yourself why you want to start blogging;

  • A great style to express your opinion and communicate to the world with your personal interests.

  • The best place to improve your writing skill.

  • The best thing you can get out of blogging is to make money out of it no matter what kind of business you are into.

Maybe you are already aware of the above outlined but it is good that it reminds you.

One last thing before we proceed to blogging:

The entire setting up process can take around more than 30 minutes to get it done, especially if you are doing it for the first time.

Well, now maybe you can grab a cup of coffee with a donut or whatever fancy you have in your refrigerator and let’s get rolling.

In case you need any help or have any questions during the setup, you can feel free to drop me an email, I will try my best to answer.

Disclosure: This blog contains a few affiliate links in the content. If you purchase any services or products I might as well earn a small commission from it.

Things that cover in this tutorial

Starting a new website can be no where from being hard, and the good news is it require no coding skill (but with a minor technical know-how, if you need my help or stuck with these technical issues, I will be glad to assist) to get your blog running and you need to do a few clicks to get it fireup.

5 Steps - How To Start a Blog For Beginner

All in all, there are 5 basic steps to build up your blog. If you follow this 5 steps guide closer and you will have your own blog set up and running in under 30 minutes. 

  • Pick a blog platform that you prefer
  • Pick a web host for your blog
  • How to get a domain name for your blog
  • Design your blog template
  • Useful plugins for your blog

Okay! We made it through the basic guide outline… phew. Now we have to get started with #step 1 without further ado. 

#Step1 – Pick A Blog Platform

First you need to make a decision which blog platform you want to use for building your website. 

If you are not sure or not knowing which one to choose or how many are available, please see the picture below, as you can see ‘Wordpress’ is the most popular and massive platform that is being used around the world because it is easy and free.

There are approximately around 82 million users who are using ‘Wordpress’  almost taking over the world by now.

wordpress

As you can see from above diagram, WordPress has gained almost 60% of the platform shares.

However there are some alternatives listed below for free blogging platforms:

The fact is ‘Wordpress’ is the giant in blogging and much larger than the 3 alternatives listed above, here are my reasons where you should go with WordPress not because I endorse it but it was the best blogging experience I can get and great for new user.

  1. Great for newbies to get it set up. Even my grandma can do it…most importantly it is free!


  2. Tons of free wordpress themes offered by third-party with no string attached! Yes, it is absolutely 100% free!


  3. Great support from multiple websites and forums. In case you are stuck with WordPress, just head to Google and type in your problems it will show up tons of solutions.


  4. It has quite a fast speed, very organized and formality that makes your blog look simple but in a professional sense.


  5. People can easily interact with your content on your blog like commenting and sharing.

Okay, let’s move onto #step 2… See how fast we are going over the guiding!

#Step 2 – Get a web host or a free host

Let’s slow down a bit and peace your mind, because we are going to discuss whether you should get a paid web host or get one for free. There are pros and cons for both choices.

All WordPress, Blogger and Tumblr platforms are offering for free. If you plan on running a blog for fun or as a hobby then I suggest you go for both free blog and free host.

Okay let me point out the Cons for using a free web host:

Can’t use custom domain name, let’s say you want to have a blog under the url name www.sally.com but you can’t do it on the free host and you will forced to have something like this:

(sally.wordpress.com, sally.blogger.com, sally.wix.com)

They look quite ugly and no one would want to click on those links. Looking worse if you include your url on your namecard.

It’s not an attractive link right?

There are a lot of restrictions in using the free host version. Images and video uploads are not possible, while some can but are limited to the amount you can upload so you won’t be able to show the world your project with such restriction. 

Theme selection is limited so you will miss out all the elegant design templates.

At worst if you plan to monetize out of your blog, forget about it, a free host won’t allow you to do that.

No ownership of your own blog. If you run a blog on a free web host, it doesn’t mean you are the owner of the blog, it may sound silly that the blog is actually belongs to the platform where you host it for free. It is like hosting a website on someone else property and if they don’t like what you wrote they can delete it anytime and it is a risk to take. Their observation team has done it before and they will do it in future too.

You don’t want your works to disappear within a second right, then the free host option isn’t a way to go. 

In contrast, if you use a self-hosted website with your custom domain name, it belongs to you 100% and no one can touch it. You are the real ownership of your blog by hosting on a paid host. 

You can customize the name of your url domain in any name you want like
www.sally.com or www.sallywilliam.com and you can virtually end with any extension (ex. .com, .net, org, .co.uk, etc.).

I hope you get a picture of running your own blog on a paid host.

In addition, you have decent speed and unlimited storage and bandwidth for your media files. You can upload unlimited pictures, video or audios to your web host, plus tons of free themes. This is a winning combo!

Now, here come the questions: how much is a web host plus a domain name cost me? It isn’t much, it costs less than the price of a cup of coffees from $3 to $12 depending on the web hosting provider you choose to use. 

I can give you a coupon code to get your web hosting plan for your first month for $0.01.

So which web hosting provider should I use? You would ask. I suggest you to get the one which is reliable, good support (someone who can answer your question) and most importantly cheap (cheap doesn’t reflect quality, I mean ‘cheap’ is inexpensive).

I personally suggest ‘Interserver’, this blog (you are reading right now) is hosted with them since 2015. I have never encountered any issues, they have great speed and uptime that doesn’t cause any issue. Furthermore, they are always able to help me solve any issue I ran into. I highly recommend you to sign up with ‘Interserver’ web host. 

You can read the review we wrote here: Interserver.net Full Review

*Note: When you sign up for a hosting plan and a domain name, they are charged separately.

#Step 3 – Begin your blog with your own domain name

If you are a beginner and don’t know what a domain name is. Well, it is your website’s address without it no one will be able to find it. It is crucial to name your domain which is easy for people to remember and no longer than 3 words.  

domainname

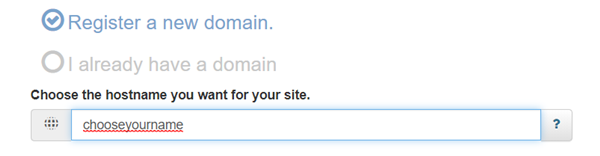
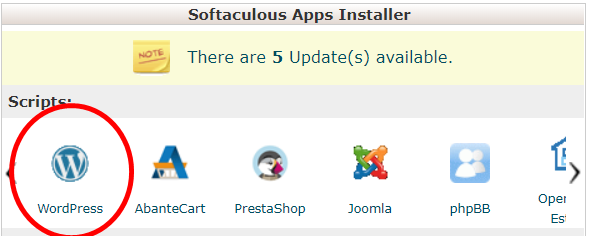
Let me begin this section, if you haven’t made up your mind yet I am going to push you to choose the best platform on earth, and yes it is WordPress! Use it now! If you already have a web host plan, you can set it up on the Cpanel with just one click. Just search for the ‘Wordpress’ and install on the domain name you have chosen.  

cpanelwordpress

In case you are confused about self-hosted blogs, especially if you are a newbie, let me explain it here and how you can get one yourself.

First you need to come up with a name you want to use, it is better to be short and no longer than 3 words. Next, head over to Interserver (Click here) to get a domain and a web host plan for as low as $1 per month. (*price may subject to changes)

If you still don’t know what is a domain and a web host, see below;

Domain: Basically it is called URL or known as your website address. Without this no one will discover your blog.

Web Host: It is like storage space where you store all the content, blog, images, video files all in one place. It holds all your content so anyone from anywhere around the world with internet access can view your blog by accessing through the domain.

Disclosure: I highly recommend ‘Interserver’ because I have been with them for over 5 years (this website is hosted with them) and am very satisfied with their services and support. If you purchase through the link given I will earn a small commission from them. 

We have been using Interserver for a long time and have nothing to complain about. 

Interserver is the most affordable ($1 for 3 months) hosting company available now. 

If you want you can click here to sign up with Interserver using the code ALEXKIJ to unlock a huge discount for getting your web hosting for $0.01 for the first month.

Delight with that!

I chose to use them to host all our websites including the blog you are reading right now.

If for whatever reason that you don’t want to sign up with Interserver feel free to search around and pick the one you like (or take a look at our Top 5 web hosting providers). Make sure it has the one-click installation for WordPress, good support and reliable hosting.

The installation is just one button that automatically sets the WordPress for you. It is as simple as that.

wordpressinstall

The only task you can do now is go ahead and sign up with Interserver (or other company of your choice), pick your hosting plan (I recommend shared host) and name your domain.

Be sure to look out for the WordPress-Install solution button under the Cpanel or if you can’t access the control center you can contact the Interserver’s support team to do it for you via their ‘Live Chat’ or ticket system. They are available 24/7.

WordPress add-on isn’t necessary, all essentials are given by your web-host like Whois Privacy, SSL certified and most importantly reliable back-ups system. (in case there is something wrong with your website, the backups help save all the information without losing them).

Start with Interserver today and get discounted price for $0.01 for the first month with my coupon code ALEXKIJ

After your wordpress has been installed on your website, go straight to your url and add this (/wp-admin) at the end it will look something like this ‘www.yourwebsite name.com/wp-admin

Take some time to understand how to add a new post, once you are used to it then you can start writing a post.

wordpresspost

Don’t worry  about the layout and elements, the navigation is simple just look out for the ‘add new post’ button then it is good to go.

#Step 4 – Design Your WordPress in the way you want

It is the fun part.

You can customize the look of your wordpress blog in the way you desire. You can either go to the appearance menu > theme and install a new one that is pre-installed or by uploading a theme.

themeinstall

On the other hand you can install a wide variety of elegant themes at ‘envato’ and choose the theme from there. There are many great themes for you to pick. 

If you plan on running an online business or serious blog, I can suggest you to check out the premium themes on Envato they have great design themes there which you can choose the one that fit your interest category. 

envato

From our experience it is best to choose a theme with white background and simple-look with a clear navigation menu. It will help a lot for your visitors and let them stick around your website for a long time. 

Your blog design doesn’t have to look professional as long as it looks clean, simple and easy to navigate around that will make people want to come back to visit your blog.

Okay we almost reach the end now. Let’s move on!

#Step 5 – Useful WordPress Plugins

Below are a few useful plugins that you can use and install on your wordpress blog. They are all free. Go to ‘Plugin’ under the dashboard on the left hand side menu and click add new, search the plugin by its name click install and activate them. 

plugin

or you can download them one by one from the link.

Elementor plugin: A useful plugin that helps you to design your blog with element blocks. It is like a drag and drop style. 

a3 Lazy Load: This plugin helps to speed up your website and enhance front end user’s visual experience in PC’s, Tablets and mobile

Accelerated Mobile Pages: Speed up your website on any mobile devices.

Google Analytic for wordpress: A tracking code that tracks your visitor activities, keywords and traffic sources. 

Really Simple SSL: It is important that all websites must install with a SSL certification for trust reason. 

WP Autoterm: To let your visitor know that you are not keeping anything of their personal detail.

Sucuri Security: This plugin provides full security to your website with the best Activity Auditing.

WP Fastest Cache: Make your website run faster and get rid of stored memory.

Yoast SEO: Help to enhance the SEO with an all-in-one plugin

Your website should now be up and running like a charm. If you have any question, please leave a comment below, I will try my best to answer them all. Good luck!

Leave a Reply

Your email address will not be published. Required fields are marked *